Road Trips and Tiny Trailers
All you need for planning the best road trips in your tiny trailer!
KEY PHOTO BASICS 101:
If you’ve read any of my other Photography blogs, you’ll know that I have been a committed point-and-shoot camera disciple.
Well… life has changed.
Don’t get me wrong…I will still sing the praises of traveling with a point-and-shoot. In fact, I will always have my trusty little Lumix in my pocket for those times when I just don’t want to miss something by fiddling with lenses and settings.
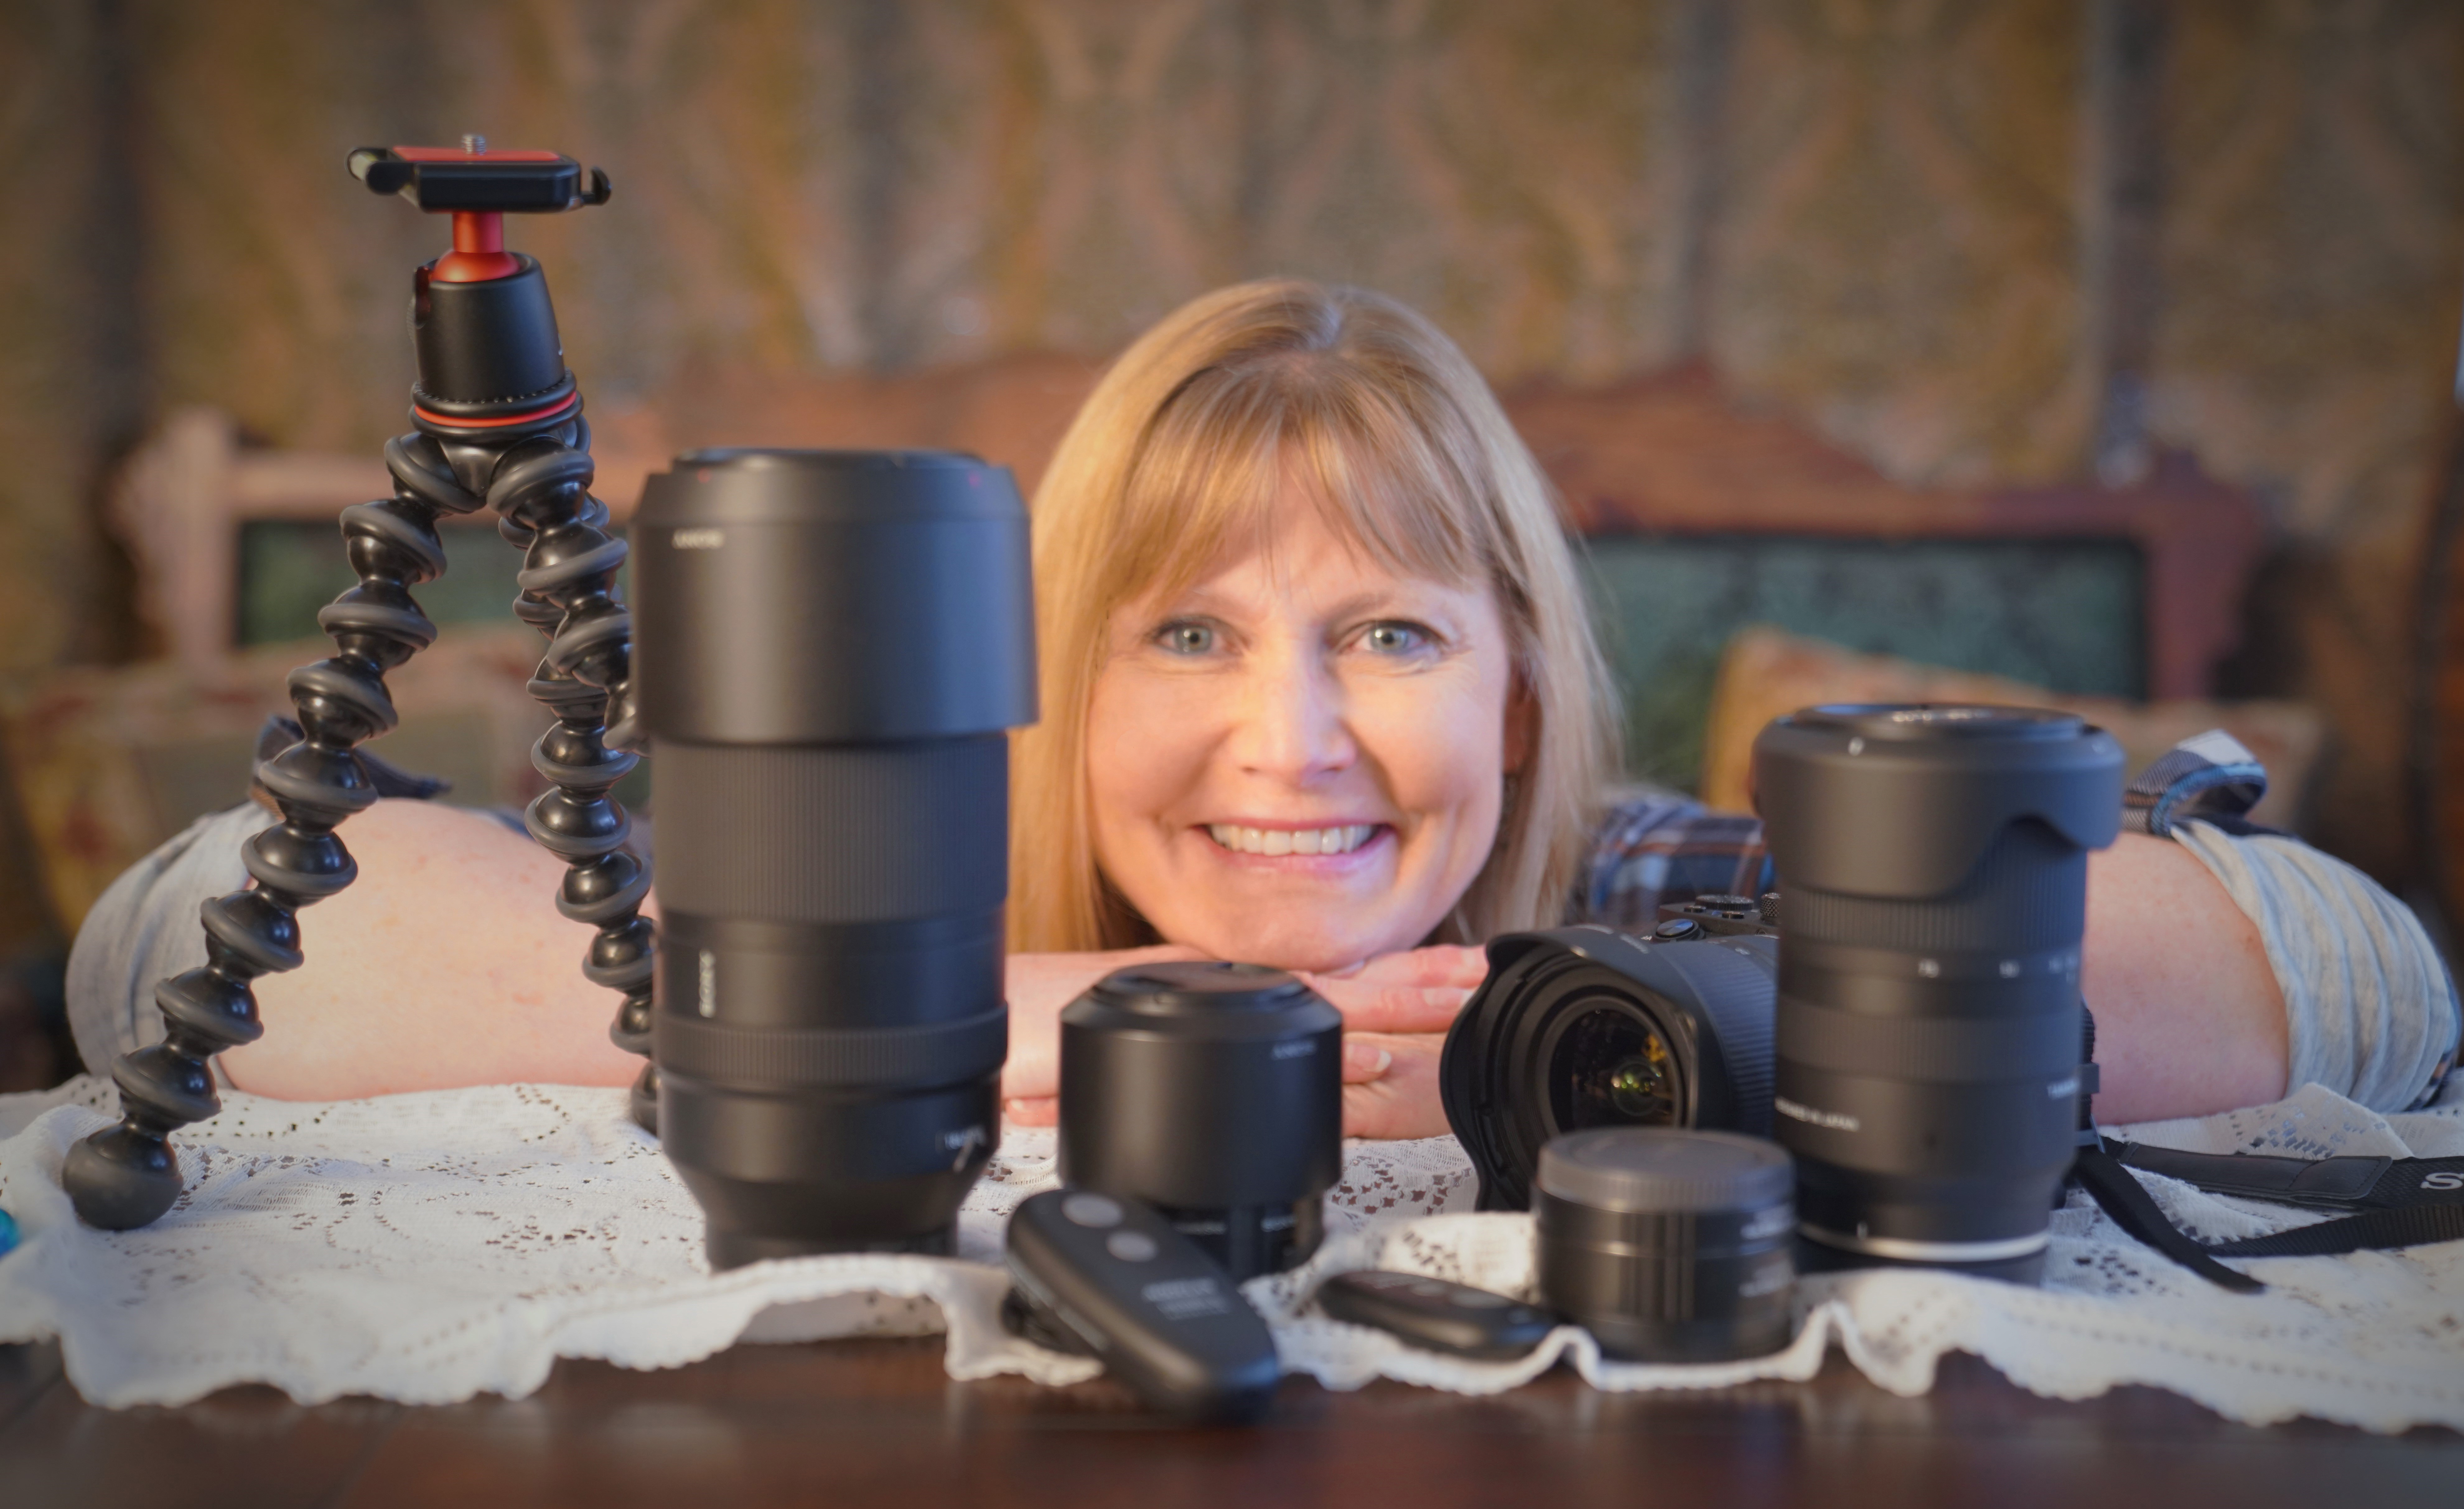
But recently my husband Eddie, bought me a Sony A7II, stuffed it in my hand, loaded me up with a few lenses and accessories in a photo backpack and told me we were going to Hawaii.
I must admit that, now that I’ve ‘taken the plunge’ I might be a little cash poor, but I’m also enjoyment rich!
So this blog is for any of you who, like me, are delving into the world of DSLR/Mirrorless with fear, trepidation and almost no knowledge. Here you will find a few tips with choosing your camera, and a few of the basic pieces of information that you’ll need to get started. So now let’s get going!
1). BEFORE YOU SPEND A DIME:
a). My best two pieces of advice are:
- Get yourself a go-to ‘Photo Person’ (PP). This could be a friend, relative, neighbor etc…, but its probably better to choose someone who works for a reputable camera store. Whoever you choose, just make sure that really know what they are talking about. Our ‘go-to’ PP is Carl from Mike’s Camera. He helps us with our
 understanding, and keeps us updated with new products. It would be hard for me to list all the things Carl does for us, so I’ll tell you what he doesn’t do. Carl doesn’t up-sell, or try and talk us into what we really don’t need or can’t afford. He is also SO patient with all our questions and info, and he never gets irritated (at least not in a way that shows) when he sees us coming in the door. So get yourself a Carl…or a Carla. And try not to wear them out…
 - Know that the world is full of answers to all your questions, and resources like YouTube videos, online classes, actual classes and books are in full abundance. Know, too, that most of these resources are not ‘fact-checked’. When I go looking for information, I like to see the same advice from at least 3-5 sources. Then I ask Carl. And yes. You should ‘fact-check’ this blog as well!

b). There are SO many options for your first camera! Just know that the quality of lenses you are working with probably make more difference in your final photos than the actual camera body does. There are, however, a couple of main things about camera bodies you should know at least a little about:
- Mirrors or no Mirrors: A DSLR camera has a Digital Single Lens with a Reflex mirror to bend the light path to the optical viewfinder for framing. With a Mirrorless camera, there is no reflex mirror. Instead, the imaging sensor is exposed to light directly. There are pluses and minuses to both types of cameras, so ask your PP for more info. To get you started, here are a few key comparisons to take note of:
DSLR cameras: are bigger and heavier, and so are their lenses. The view finder is slightly more accurate, and there are more lenses and accessories available. There is a little more ‘real feel’ of using a more traditional DSLR, and you can use your knowledge of settings a little more effectively.

Mirrorless cameras: are smaller, lighter weight and a little more versatile. The viewfinder is electronic and displays directly from the sensor. You’ll find more info & tools shown on the screen to help you with your settings, and the lenses and accessories are smaller and lighter weight. Mirrorless cameras are a tad more ‘beginner friendly’, and these are better for video or fast moving subjects. Mirrorless seems to be the wave of the future as most manufacturers are making their version of a mirrorless option.

- Full Frame or Crop Sensor: To understand the difference, think of cropping a photo on your computer with your version’s photo program. Maybe you don’t want your neighbor waving at the camera in the family shot that was taken in your backyard. You select the part of the image that you want to keep, (cropping out your photo-bomber) and it brings the image in closer. This end result is basically what a crop sensor in your camera does. There are different sizes of sensors, so the smaller the sensor, the more zoom effect you get. It can however, potentially lessen the quality of your photo. Here are a few of the differences:
Full Frame Cameras: These cameras have more and larger pixels, so more light is let into the photo, potentially resulting in better quality. This also means that there is more information for every photo you take, and more ability to alter the image later with your photo program. The sensor is 35mm, the same size as a film negative. (35mm has been accepted as the standard since 1909. 35mm film gave the best quality for the best price, and was the closest to what the naked eye actually saw.) Full frame cameras perform better in low light and usually have less ‘noise’ (those discolored and distorted grainy spots on your photo). Not all lenses work with a full frame camera, so be careful when purchasing lenses.

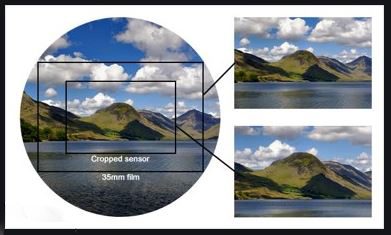
Crop Sensor Cameras: These cameras have smaller and fewer pixels. The smaller the sensor, the smaller you need to keep the final image for it to look good. Cellphone cameras have the smallest sensors, so although they look great on your phone, you’ll never want to blow any of these shots up to frame as a wall hanging. Using any sensor smaller than that 35mm area of the full frame, means that your sensor is simulating changing the focal length of the lens by cropping out the edges of the photo in your frame and bringing the subject closer. A crop sensor can be great for sports photography and wildlife where you want more telephoto ability without having to change the lens. These cameras are usually less expensive.
I hope this information has been helpful for you, and hopefully you won’t be completely overwhelmed in your first conversation with a camera salesman!
I also hope that you will take a little time and assess what your goals and needs are, as well as your budget. There is really no ‘wrong’ choice…only a ‘wrong for you’ one.
I’d love to hear from you when you’ve purchased your camera! You can let me know what you decided on and why HERE. Once your new investment is in hand, it’ll be time to move on to this next section…so let’s dive in!
******************************************************************
2). THE EXPOSURE TRIANGLE
A photo is called an exposure. An exposure is comprised of 3 primary settings: Aperture, Shutter Speed, and ISO. All these settings control light and have to work in balance with each other.
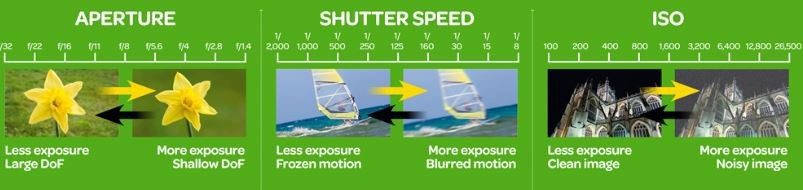
a). ISO Setting:
ISO is basically the camera’s sensitivity to light. The higher quality the camera, the more sensitive it can become. The more sensitive it is, the more ‘noise’ you will have. (once again, ‘Noise‘ is a term used to describe visual distortion. It looks like grainy splotches of discoloration). The most important things to know are:
- Levels of sensitivity are measured in stops: 100, 200, 400, 800, 1600, 3200, & up.
- Each stop doubles the camera’s sensitivity.
- The higher the quality of camera, the more stops there will be.
- The higher the stop number, the more light is let in.
- The more light that is let in, the more noise there will be.
- Make it easy on yourself: Use the lowest ISO stop possible to get the shot you desire.
b). Aperture Setting:
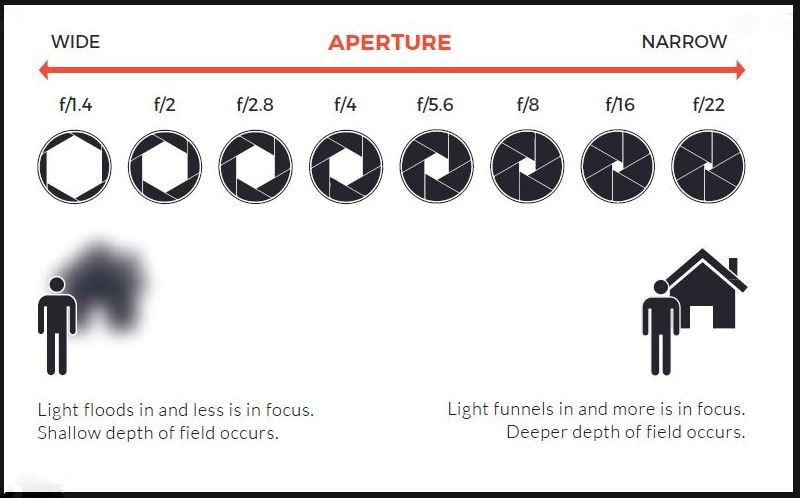
Aperture controls the opening of the iris in the lens, or depth-of-field, and determines how much of your picture is in focus. The camera sees in 3-D, so it sees the depth of your shot. The wider you open the iris, the more of your shot will be in focus (for greater the depth of field). The smaller you open the iris, the less of your shot will be in focus (for shallower the depth of field). This is how you get those lovely, soft blurry backgrounds. The most important things to know are:
- The opening of the iris is measured in F-stops: F32, F22, F16, F11, F8, F5.6, F4, F2.8 F2, F1.4,F1.8
- The larger the F-stop number the smaller the opening, and greater the depth of field. The smaller the F-stop number, the larger the opening and the shallower the depth of field.
- The larger depth of field means more of the photo is in focus -The shallower the depth of field, the more parts of the photo are blurry.
- The larger the depth of field, the more light is allowed in.
- Max F-Stop settings available will depend on the lens you’re using.
- Make sure that what you want in focus is inside the focal brackets in the view finder.
- Make it easy on yourself: The More you want in focus the Bigger the number. The Less you want in focus, the Smaller the number.
c). Shutter Speed Setting:

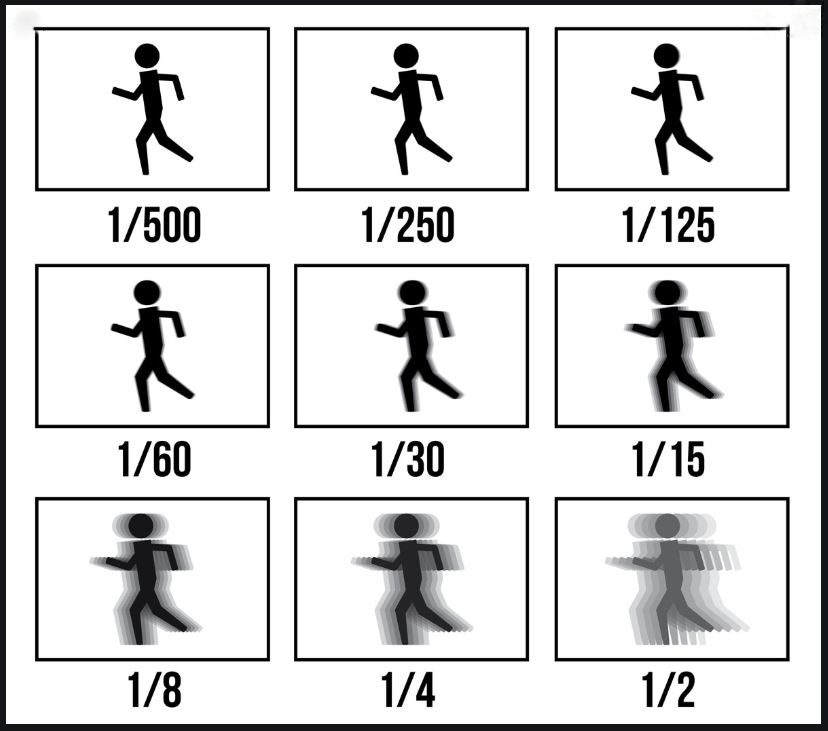
Shutter Speed controls how fast the shutters in the camera open & close. The faster the speed, the less light is let in, making the photo in sharper focus. The slower the shutter speed, the more light is let in creating motion blurr. This is how you get that soft, ‘cotton candy’ look to waterfalls and water in motion. The most important things to know are:
- The speed of the shutter is measured in stops or fractions of 1 second: 1/2; 1/4; 1/8; 1/15; 1/30; 1/60; 1/125; 1/250; 1/500; 1/1000…
- Each stop halves the amount of each second of time.
- Minimum and Maximum settings available will depend on the lens you’re using.
- Motion blurr begins between 1/50 and 1/125.
- Whatever focal length your lens is set to, the photo’s max clarity will probably be around 1/that focal length number – unless your focal length is under 50mm. Motion blurr begins around 1/50. At this point, you’ll probably need a tripod.
- Make it easy on yourself: The Faster the stop, the Clearer the photo will be. The Slower the stop, the more Blurry the photo becomes.
3). TRANSITION: HOW THE TRIANGLE WORKS TOGETHER
All three sides of the Exposure Triangle has its own unique part of the final exposure, and all 3 affect light. If you alter one setting, the other 2 need to be altered as well. The most important things to know are:
A. Aperture and Shutter Speed are the two settings you’ll probably work with the most.
B. After setting your Aperture and Shutter Speed to where you want them, check and make sure the ISO is as low as possible.
C. All 3 settings will show on your screen or in your viewfinder.
D. If you’re working in Manual mode, and you alter either your Aperture or Shutter Speed, then adjust the other the same number of stops. Then make sure the ISO is as low as possible.

There are also 3 other settings or tools that can have a big effect on your photo:
E. There is a Composition Dial (+/- 0.0) to take note of, and you’ll find this on your screen or in your viewfinder. This number will tell you if your shot is over or under exposed. If the number is red, adjust the dial to where it reads 0.0. This dial will not work in full manual mode. You’ll need for the ISO to be in Auto.
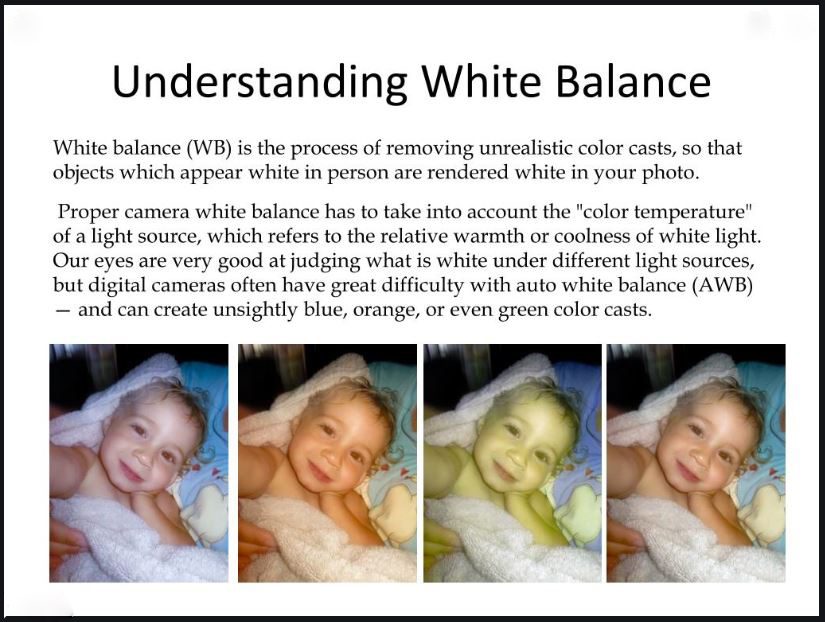
 F. The other setting you’ll want to look at is the White Balance. It can make a huge difference with your exposure. You might need to check your camera’s manual to see where its located. Start by looking in your menu. Look for these symbols:
Then check this out:
G. The last tool to take note of (at least for now) is the Histogram. A histogram is a graph representing the pixels exposed in your image. The left side of the graph represents the blacks or shadows, the right side represents the highlights or bright areas and the middle section is mid-tones. How high the peaks reach represent the number of pixels in that particular tone. Each tone is from 0-255 (o=black and 255=white) is one pixel wide on the graph. You will also find this graph, too on your screen. It looks like this:
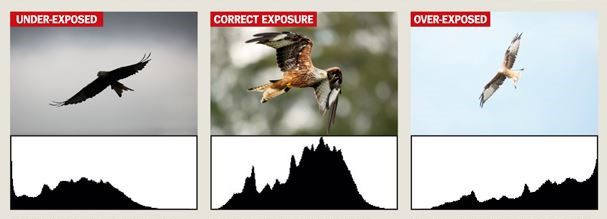
You’ll learn more how to use this tool as you learn, but to start with just know that you want the spikes to be in the center of the graph, and be as smooth as possible .
4). LEARNING FROM YOUR CAMERA
Although it is definitely a goal to become proficient in full manual mode, if you start with a partially manual mode you can learn a lot about how to make your settings all work together. The most important things to know are:
A. MODES are found on a dial on top of your camera. Dials vary with the brand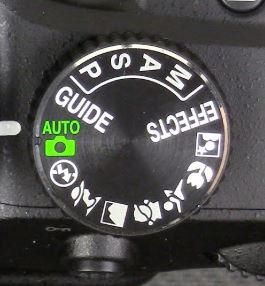 name, but they all do basically the same thing. The camera’s manual will help you learn all the settings.
B. Start in AUTO mode in any given situation, and pay attention to the settings your camera selects. This is a good ‘jumping off point’ for you to figure out where to start with choosing your settings in a particular lighting situation. Then jump to a partially manual mode.
C. The best 2 modes to start with are A & S. You’ll probably use A most of the time.
D. Select A if the subject of your exposure is still and/or you want to control the background or foreground around your subject.
E. Select S if the subject of your exposure is in motion, or the point of the shot features something or someone in motion.
F. The A on the mode dial sets the camera to allow you the Aperture setting you want, and then self-adjusts the Shutter Speed. You still control the ISO.
G. The S on the mode dial sets the camera to allow you to choose the Shutter Speed you want and then self-adjusts the Aperture. You still control the ISO.
H. Pay attention to the settings that your camera chooses. Understanding this ratio or combination of settings will help you when you move on to full (M) manual mode.
5). UNDERSTANDING LENSES:
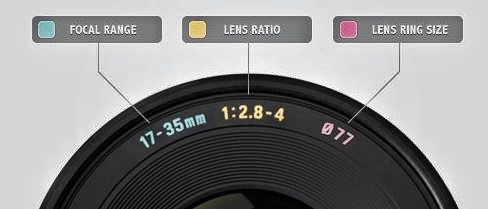
When you look at the end of your lens, you’ll see 3 main pieces of information. The Focal Length, the Lens Ratio (or Aperture opening range) and the Lens Ring Size of the filter that will fit the lens.
A. FOCAL LENGTH: Represented by ‘mm’. It is the distance between where all  the light comes together inside the lens, and the sensor of the camera. This matters because the focal length will tell you how much of the scene will be captured and how large a subject will appear. The lower the number, the wider the field of view and the lower the magnification. The higher the number, the narrower the field of view, and the greater the magnification. The size of the sensor in your camera can affect these numbers.
B. MAX APERTURE or LENS RATIO: The range of numbers (often decimals) that tell you how small to how wide your aperture setting can go. A single number means that there is only 1 setting that your aperture will do. This is a Prime lens.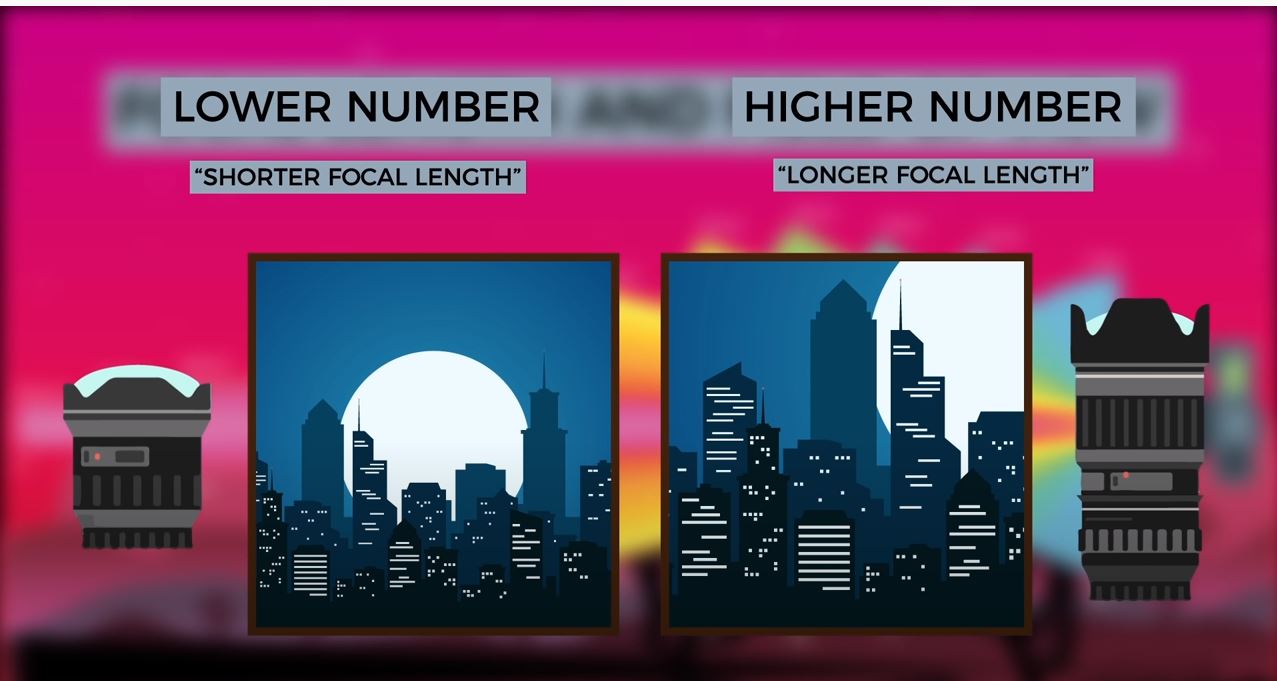
C. LENS RING SIZE: A single number with a symbol (varies with the brand) that tell you the size you’ll need if you want to attach filters.
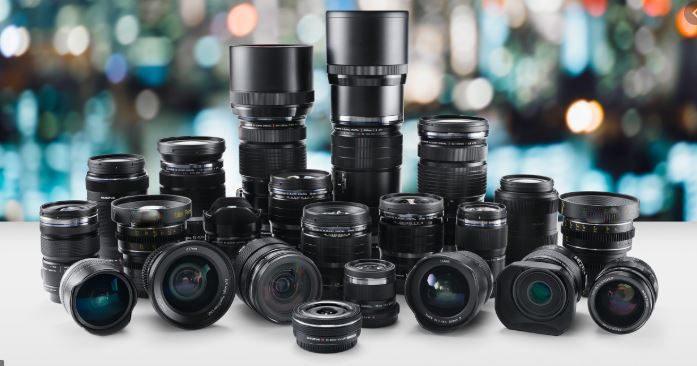
6). CHOOSING LENSES:
Most likely your camera came with a lens (just an FYI…your ‘kit’ lens is probably the bottom of the line. I just traded in the 28-70 lens that came with my set and upgraded it). But as you develop your skills, you’ll want to add lenses to your collection that you’ll need for specific scenarios. Here’s a basic idea of lens categories:
A. WIDE ANGLE LENSES: Typically, these lenses run between 24mm-35mm. (If the mm is lower than 24, then you’ll get distortion and that fun ‘fish-eye’ effect.). It’s good to have a wide-angle lens for landscapes and tall / large architecture.
B. STANDARD LENSES: The 35mm-70mm lenses are very versatile and are the best ‘go-to’s for a beginner. These lenses will produce photos that are the closest to what our eye see. The lens that came with your camera is probably a 28-70 or similar.
C. TELEPHOTO LENSES: These usually come in the 70mm-400mm range. The lower number ranges are good for portraits and the larger numbers are for capturing things far away. (If you have one lens from each of these first 3 categories, you’ll be able to do most anything as you get started).
D. EXTREME TELEPHOTO LENSES: With a focal length of more than 400mm, these are what you would choose for wildlife, birds, and where you need extreme magnification.
E. MACRO LENSES: Also called Micro lenses, these are for photographing tiny things or doing extreme close ups. They range in focal length from 40mm-around 110mm. Be careful, though. A true Macro lens has a 1:1 ratio. This means that the actual object you’re photographing is the same size as the image that shows up on the sensor.
F. PRIME LENSES: Prime means that the focal length is fixed and there is no adjustment. These lenses are usually better quality than zoom lenses, and although they are less versatile, they are cheaper.
G. ZOOM LENSES: With a Zoom, you have a more versatile lens with focal length options. They are like having several prime lenses in one. Quality is diminished some due to their complexity, and the cost is much higher.
*One thing to note is that the Tamron manufacturer of lenses usually can offer you a lens for your camera that is less expensive and of equal or better quality.

Lenses (and their prices!) can be overwhelming. Just stick to the basics and go slowww..
7). OTHER HELPFUL TIDBITS
A. All the Lenses you will purchase come with hoods. You’ll learn when and when not to use it as you become a more experienced photographer. As a beginner, though, just use it all the time.
B. If you are interested in macro photography, (capturing bug’s eyes, flower petals, and water droplets etc…) check out Extension Tubes. For a wayyyy smaller price tag than a macro lens, they can turn a lens that you already have into a macro lens by changing its focal length. Check it out!
C. Filters: There are some creative and fun filters out there, but I recommend getting a UV filter for each lens. These filters protect the lens from getting scratched or broken, and can be exchanged for new ones when they get damaged. It’s much better than having to buy a new lens!
D. Be careful to protect your camera’s sensor. Get a good cleaning kit for it, and don’t touch it with your finger. Anything that is on the sensor (dirt, fuzz, your fingerprint…) will show up on every picture, so don’t switch out lenses in the wind! Also, many dealers offer once-a-year cleaning / inspection with your purchase. Take them up on it.
E. If you decide to switch out or upgrade a lens or a camera body, check with the dealer you purchased it from. Often they will give you a trade-in credit toward your next purchase if your item is in good shape and not damaged. Always keep the box as it will give you a better trade-in value!
F. Always keep your point-and-shoot camera with your gear, so that you won’t miss special moments because your fiddling with your settings.
*******************************************************************
Well, from one beginner to another, this is my best advice on getting started with a DSLR or Mirrorless camera. Make sure you get these basics down…because there’s lots more learning to do! C’mon now…we can do this!
Also, check out some of our favorite shots on our photo website! Click HERE